Showing posts with label rinea. Show all posts

Wednesday, April 26, 2017

Rinea Flower Stick

Hello Friends!!!

Today I'm going to share a tutorial for making a card from Rinea paper foilsThese foils are made up of paper lined with colorful aluminum foil on both sides. It works like paper and foil at the same time and can be used with any paper crafting tools. It maintains the shape however it is bent or folded without crinkling making it ideal for 3-D arts and craftsThese are great for embossing, die-cutting, punching, sanding, folding, spray painting, stamping, writing, and gluing. It works with electronic cutting machines using a low tack mat and the same cut settings that are used for paper. These are available in many exciting color combinations including bold, pastel, and metallic colors with glossy and embossed finishes. These are perfect addition for scrapbooking, making cards, home decor, jewelry, ornaments, mixed media art, and much more. Here is my project:


This stick is very easy to make. For this I used pink embossed Rinea foil, wooden stick, glue, scissors. Lets start making it.

1. Take one pink embossed Rinea foil

2. Cut one strip of around 3 inches 

3. Leaving some space make the slits of 1/4 inches on whole strip

4. With the help of wooden stick roll each slit


5. Apply the glue on flat part of strip and stick it on wooden stick.

6. Stick is ready to put in vase


Hope you like this. Please leave your comments.


Sunday, March 26, 2017

Rinea Leaf Card Tutorial

Hello Friends!!!

Today I'm going to share a tutorial for making a card from Rinea paper foilsThese foils are made up of paper lined with colorful aluminum foil on both sides. It works like paper and foil at the same time and can be used with any paper crafting tools. It maintains the shape however it is bent or folded without crinkling making it ideal for 3-D arts and crafts. These are great for embossing, die-cutting, punching, sanding, folding, spray painting, stamping, writing, and gluing. It works with electronic cutting machines using a low tack mat and the same cut settings that are used for paper. These are available in many exciting color combinations including bold, pastel, and metallic colors with glossy and embossed finishes. These are perfect addition for scrapbooking, making cards, home decor, jewelry, ornaments, mixed media art, and much more. Here is my project:


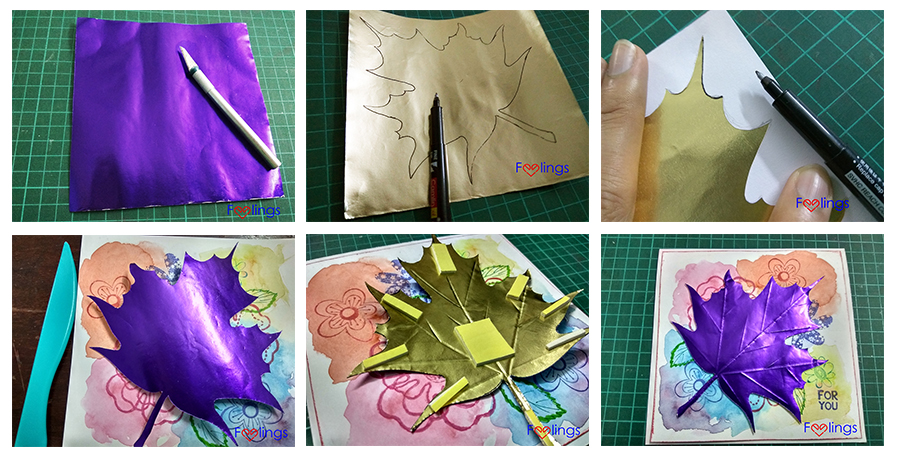
This post is heavy and full of image so sit back with a cup of coffee and enjoy the steps. I made my card by cutting the foil by X-cato knife. Here is the full tutorial for making the card:

1.) Take white card stock measuring 6 inches by 12 inches and fold in half to make the card base. Now take another white card stock measuring 5.5 inches by 5.5 inches to work with colors. I used wet on wet technique for making the background. Start by applying water on paper

2.) Now drip the colors on wet paper, it gives amazing effect

3.) Now stamp some flowers and leafs from Versacraft permanent ink

4.) Take double sided purple Rinea paper foil and draw the leaf on foil. I first drawn and cut on paper then taking that paper as guideline drawn the leaf on foil using permanent marker and cut the foil by X-Cato knife

5.) After cutting the leaf on foil score the veins by bone folder to make the leaf more natural. Adhere this leaf by foam tape to give it 3D look

6. Finally stamp your favorite stamp and your card is ready :)


Hope you like like this tutorial and try this. Please leave your comments and feel free to ask anything.


Wednesday, March 1, 2017

Rinea Foil Candy Card

Hello Friends!!! 

Today I'm sharing a cute card made from Rinea foils. These foils are very versatile and can be used in many ways like folding, stamping, embossing, cutting, etc. For this card I punched circles from various colors of Rinea foils and glued together to make a candy. Here is my card.


Hope you like this card. Please leave your comments and follow my blog to stay tuned.

Monday, February 27, 2017

Heart Pendant Tutorial

Hello Friends!!! 

Today I'm showing an easy way to make your style statement. Everybody loves to look attractive and to wear a statement style piece and if it is handmade then that is the cherry on the cake. I made this necklace using Rinea foil in Copper. These foils are very versatile and can be used in many ways like folding, stamping, embossing, cutting, etc.  I fold the paper to make it shine and shimmer into an amazing piece that is sure to amazing anyone!

Here is the video tutorial:


Here are the pics of this awesome pendant:


Thanks for stopping by. Please follow my blog to stay connected.


Sunday, January 29, 2017

Creating Banner with Rinea Foil

Hello Friends,

Today I'm going to share an interesting idea to make your banners with Rinea Foils. These foils are so versatile that you can die cut in cutting machines like Big Shot, Cricut, etc. You can easily punch these foils and every time you get a crisp and sharp punch. The possibilities are endless. Here is the final look of banner I made:


Here is the full procedure how I created this banner. I decided to cut the letters in Cricut Exlore so I opened my software and write BUY HANDMADE and kept the font Arial  Black as I wanted my letters bold. 

Then I took silver embossed Rinea foil and stuck to a very less sticky mat. I adjusted my cutting pressure on paper which gave me the perfect cut.


For the banner backing I took red card stock and spellbinders dies and ran through my Big Shot.


Now my backing and letters are ready. I stuck the letters on square backing and stuck blue ribbon too.


Now to make banner more attractive I took blue embossed Rinea foil and snowflake punch. I punched several snowflakes and stuck two flakes one on another to give a flower look and finally stuck the middle stone to add the beauty. 


Finally I stuck these flowers on my banner panels.


Here is the complete list of supplies:
Cricut Explore Air Machine
Big Shot Machine
Spellbinder Nestebilities
Snowflake Punch
Red Cardstock
Blue Ribbon
White Stones
Glue, Scissors, Crafting Mat


Thursday, January 12, 2017

Rinea Gift Flower

Happy New Year!!! 

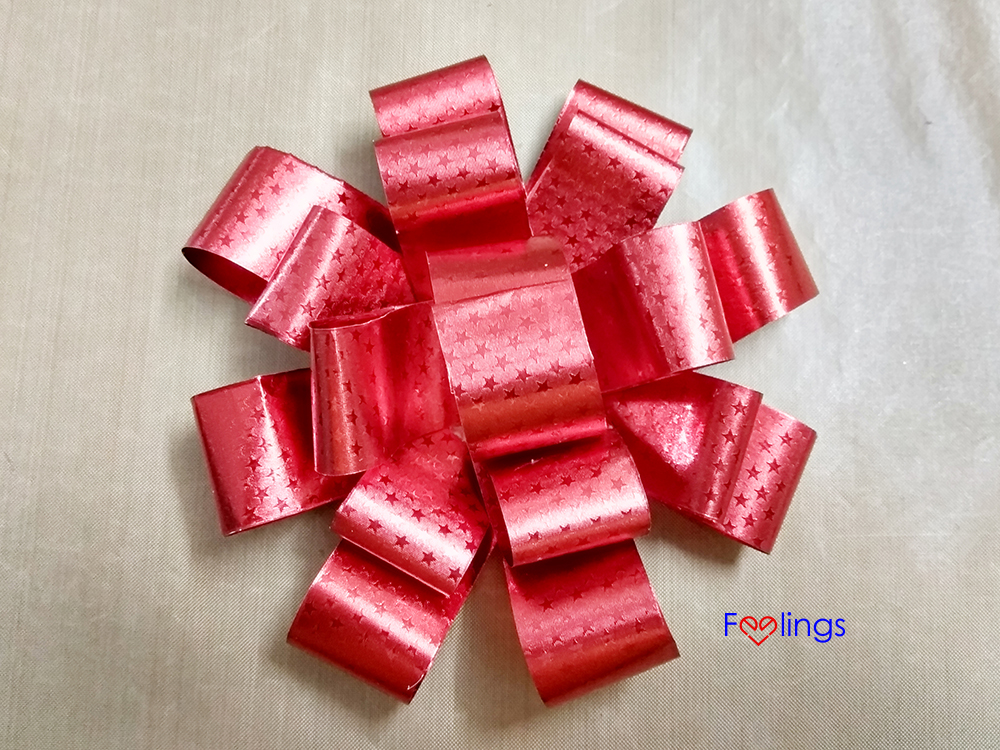
Today I'm showing an easy way to to make your gift wrapping beautiful. We all need to wrap a gift for our dear ones and always feel that it should be attractive. Here is a simple way to make a bow using Rinea foils to add charm to your gift. 


Here is a video tutorial on how to make this stunning bow.


Hope you will try this and give your comments.

I would to like to play with:
Crafting by DesignsAnything that Shines!


Monday, December 19, 2016

Christmas Candle


Hi crafty peeps!!!

Thank you for joining me for my first Design Team projects for Rinea foil. I wasn’t sure what to expect but after using these foils I come to know that these foils are quite sturdy. You can fold them, bend them, emboss them and more. The foils are made of paper surrounded by 2 layers of colored aluminum foil so there is a nice weight to them.

As we are on our way towards Christmas, I created a Christmas Candle which can be used as a beautiful center piece. Although this tutorial has a Christmas theme but by changing the outer decorations you can use it for any occasion.


This is a long post with lot of images so grab a cup of coffee and sit back to read this :) 

Supplies:
Candle
Big Shot Machine
Card board
Spellbinders nestabilities star circles die 
Gina Marie stitched circle dies 
Burlap 
Fairy decorations 
Bow decorations 
Red and green paper flowers
Golden Thread
Glue

Procedure:

Take Gina Marie stitched die and card board and run through your big shot machine to make circle


Apply glue on the base of the candle and stick it to the circle card board


Take Gina Marie stitched die and burlap and run through your big shot machine to make a circle


Take Spellbinders nestabilities star circle die and Rinea paper foil and run through your big shot


Apply glue on burlap and stick Rinea cut out on burlap. Save small stars from the cut out for further use


Take your candle and stick red stones and stick small stars randomly that we saved from die cut


Apply glue on candle and stick golden thread on it


Now take that burlap stuck with Rinea paper foil and stick the fairy decoration with bow and bells and stick it to the candle


Decorate the backside of candle with a bow decoration. Stick red and green flowers on the cardboard to add more beauty to it. Candle is ready for display


Thanks for stopping by. Don't forget to follow to stay connected.

I would love to enter in these challenges:
Country View Challenges
Essy-floresy
Jingle Belles Christmas
C.R.A.F.T #394 Christmas 
DL Art- Thankful Thursday Any Winter Holiday
Crafting by Designs Happy Holidays
Inky Chicks #76 Traditional Christmas Colors
Crafts Galore Encore Christmas
Country View Challenge Christmas
Love to Create : Mixed Media Goes
The Mixedmedia World : Winter Wonderland
Glitter n Sparkle : X'mas with Glitter